

How To Share Files And Folders In Windows 7
In Windows x, the option of File and Folder Settings has changed. The reason behind it is the removal of the HomeGroup Icon. This HomeGroup Icon was available in Windows 7 and Windows eight. Therefore, it is difficult for users to navigate the correct options of sharing Files and Folders in Windows 10. A lot of options are nowadays for sharing files and folders in Windows 10 over a network.
Still, Sharing files and folders on Windows 8 is similar to sharing files and folders on or between Windows 7 computers with one exception which is the password protected pick located within the "File and Printer Sharing"
To demonstrate file sharing betwixt Windows 7 and Windows 8 – I will exist using 1 x Windows vii and i xWindows 8 running on my VMWare Workstation.
1. Setting upward Sharing in Windows 7
i. On your Windows 7 figurer/laptop go to Control Panel -> Network & Internet -> Network & Sharing Center -> Advanced Sharing Settings
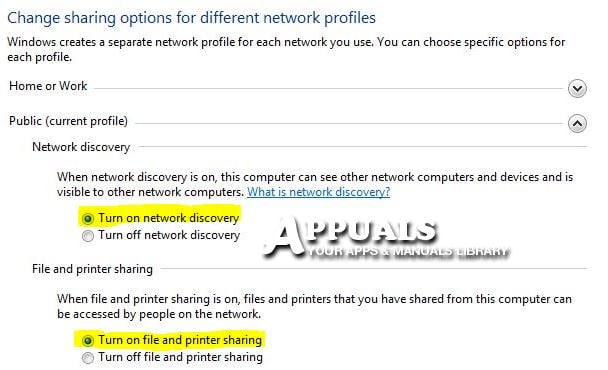
Enable "Turn on network discovery" and "Plough on file and printer sharing".
If y'all want to password protect your folders then Plough on the password protected sharing which is the terminal option within the Advanced Sharing Settings. But users with access on this calculator will exist able to access the shared folders, when accessing files on other computers yous volition need to use the username for the Windows vii calculator to access shared folders.
Now since we have enabled the required options, Click on the Save Changes button at the lesser.
2. Select a Folder or Folders to be shared from Windows 7 computer.
Right click on the folder that you want to be shared and selectShare Withso selectSpecific People.You volition become the Sharing option on all folders you right-click.
You will at present exist given a field to blazon in the username or select one from the list available in the pane below. Either select a username here, or create a username and assign a password to the username. When yous'll try to access the folder from the other estimator/computers you will be prompted to provide this username and it'south countersign in order to access this folder.
Under the Permission Level, chose what permission the user should accept.
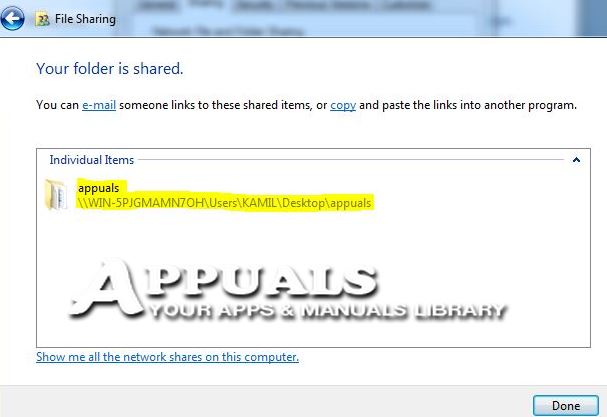
Re-create the path shown here (eg:\\computername\users\username\desktop\binder) and keep a note of it since you will demand this to access the folder on the other computer. Now the folder is shared, click Done.
That'southward it. Y'all have now shared the folder on this computer.
ii. Setting upwardly Sharing in Windows 8
Sharing in Windows viii is similar to sharing in Windows vii.
Get to the Control Console> Network & Net -> Network & Sharing Middle -> Avant-garde Sharing Settingsand turn the sharing on equally you did for windows 7 to a higher place. (This is required if you wish to share folders from windows 8), but not if you lot wish to admission shared folders from Windows vii.
You may as well practise a curt cut to skip steps and automatically locate other computers on the network such every bit the Windows seven ane above from where we shared the folder.
To exercise this leave out of the tiles mode to the Desktop mode on Windows 8. Hold the Windows key and Press E.
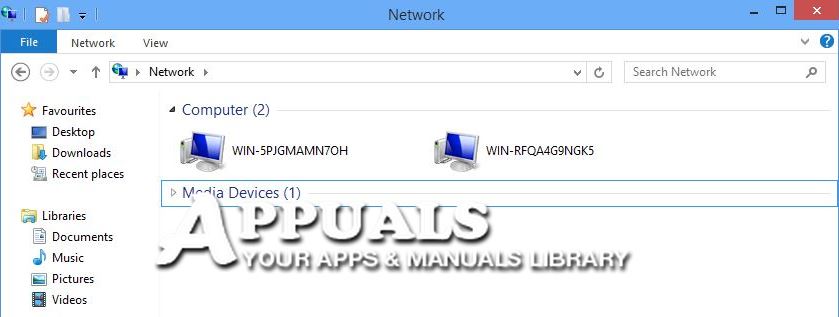
And then selectNetworkfrom the left bill of fare. You lot will see a notification on top to plough on "Network Discovery and File Sharing" click on it and turn it on.
Inside two-iii seconds, other computers connected to the network will appear. (Run into screen beneath)
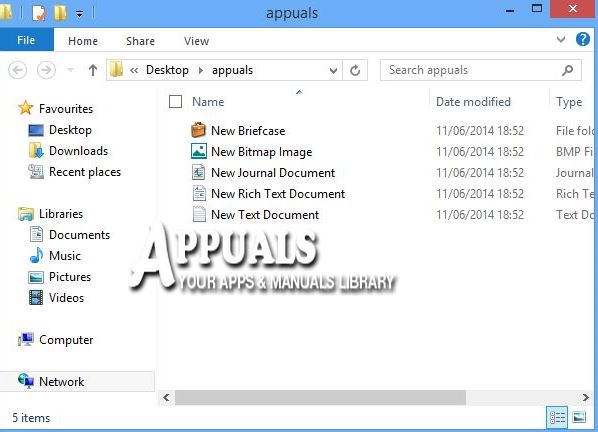
Now simply double click the computer name where the files are shared to view the shared files. If asked for the username and password for the PC where the files are shared, provide it. (This is the username for the PC where the binder is shared) If at that place is no password setup for the user on Windows 7, so you will exist required to gear up 1 upwardly.
Notwithstanding, this will display everything that is shared. If yous only want to access the shared folder then copy the path from the folder which is shared by right clicking on that folder and selecting Properties -> Sharingand so copying the path from nether Network Path: in this case it is\\WIN-5PJGMAMN7OH\Users\HIDDEN\Desktop\appuals.
In the Windows 7 sharing, i also explained how you would copy the path immediately subsequently the folder is shared.
To access shared on Windows 7 simply repeat the aforementioned steps every bit shown above on accessing folders on Windows 8.
3. Setting up a Sharing in Windows 10
3.1 Sharing the Files using File Explorer
Windows 10 provides a built-in characteristic to share files. This is visible from the context carte du jour; any file/binder you click will the option to Share Files. You lot can also define read and write permissions when sharing files or folders. It is of import that any devices within which files are beingness shared are on the aforementioned network (Wired LAN) or (Wireless Lan).
- Open up the File Explorer in Windows ten. Go to the folder that you want to share.
- Correct Click on the folder and then select the Backdrop.
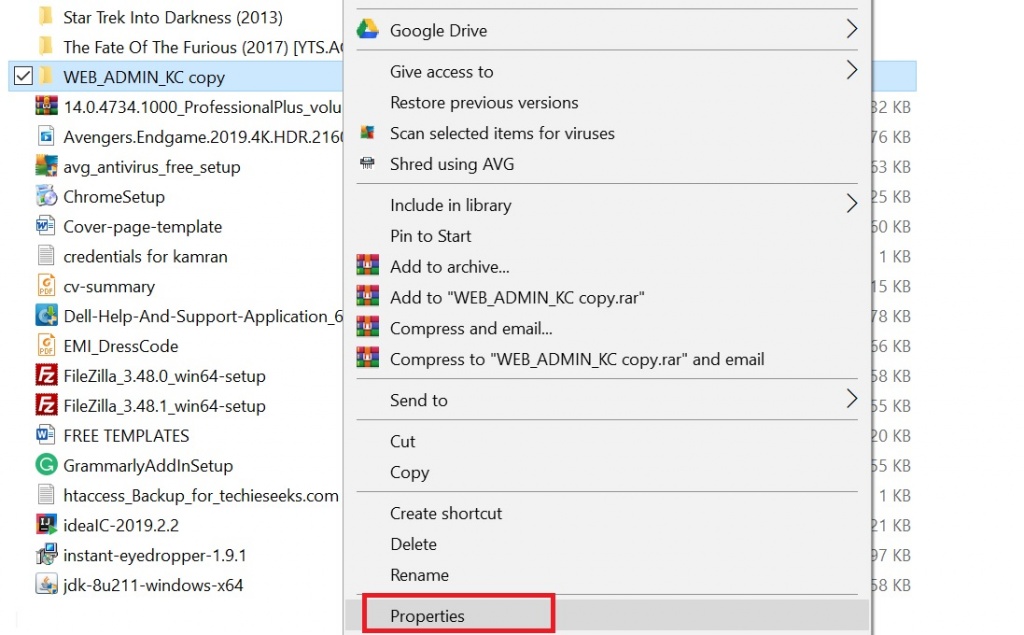
Properties option in Windows x - In the next stride, click the SHARING tab.
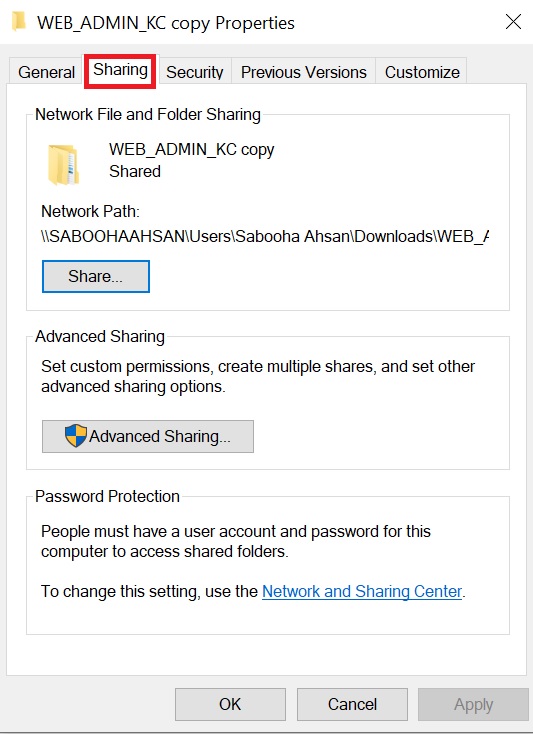
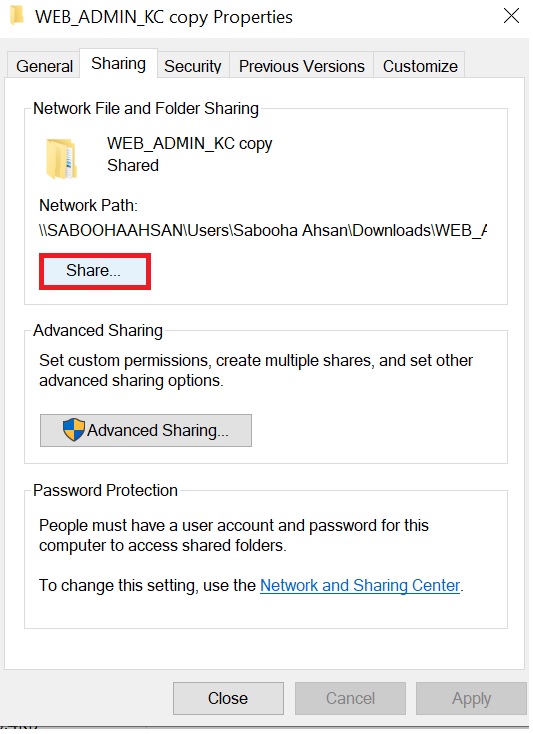
Sharing Tab in Windows 10 - Click the Share Button.
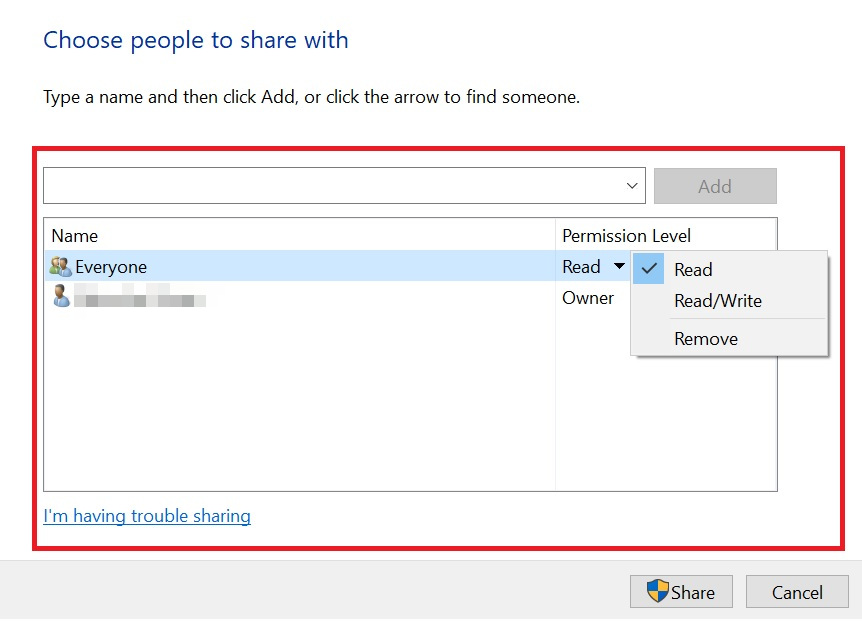
Share selection in Windows 10 - You will get a dropdown menu for selecting the user or group to share the file or folder.

Selecting a user or grouping for sharing files - You can as well add other users for sharing the folder by clicking the Add Push.
- By using the permission level section, you tin can select dissimilar types of sharing permissions. The dissimilar sharing permissions include read, read, or write, and remove options. Select your advisable selection.
Customizing Sharing Permissions in Windows ten - You have to retrieve the network path for your binder or file that you lot are sharing with the users.
- This network path is essential for other users to admission the content by using the network.
After following the higher up-mentioned points, just click the "Close" push button and your file will exist shared among your target audience by using File Explorer.
3.ii Using Avant-garde Settings for sharing the files
Avant-garde settings in Windows 10 permit the users to set custom permissions for any file or folder. For sharing the files by using the "Avant-garde settings", employ the following steps:
- Open File Explorer by holding the Windows Key and Press Eastward.
- Become to the File or Binder that you want to share with other people.
- Click on the detail that yous want to share and select the Properties.
- Select the SHARING TAB.
Sharing tab in Windows ten. - Select the selection of Avant-garde sharing.
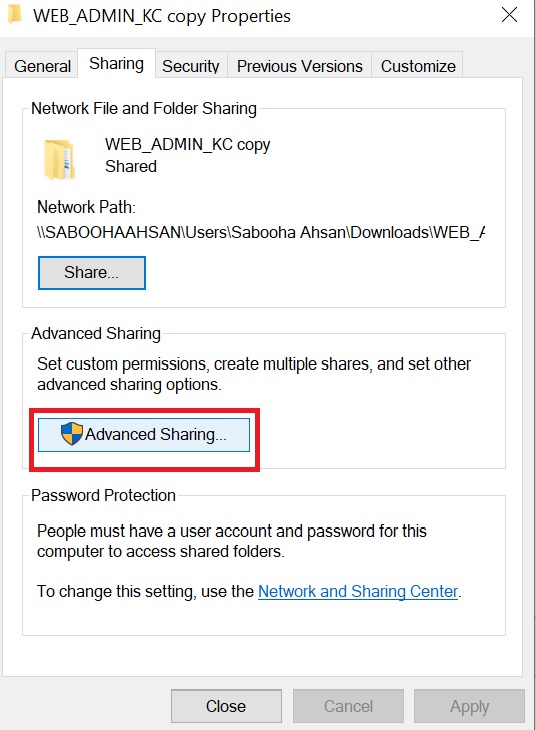
Advanced sharing selection in Windows 10. - Click the option of Share This Folder.
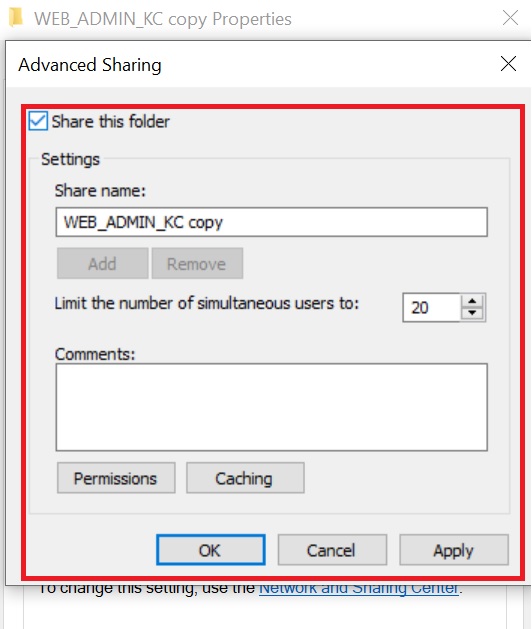
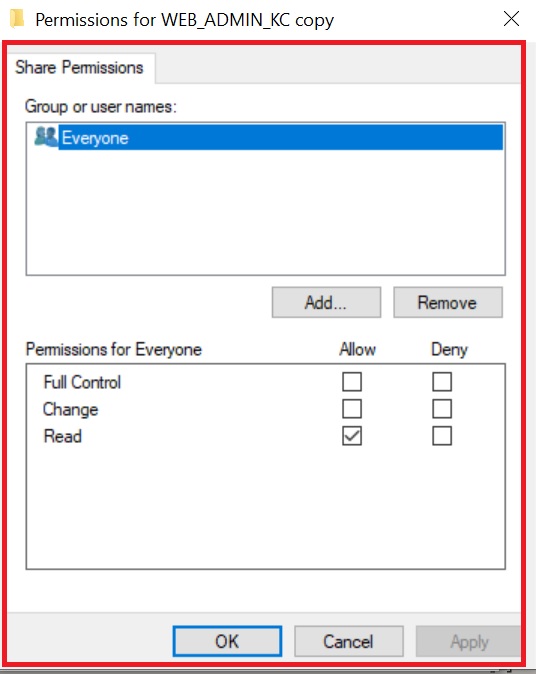
Folder Sharing Options in Windows 10. - In Windows 10, by default, the only admission given to the users with which you share your content is the read-only admission. It ways that whenever y'all volition share your files or photos with other users, by default they will only be able to read the document and they will non exist able to modify the content. If you want to grant sure permissions to the other users such as deleting, creating new documents, etc then you have to click the Permissions push.
- By using the Permissions Options, you will see the different options that are given to you for customizing permissions with different users regarding shared folders and files. You will customize the permissions for different users or groups with which you lot are sharing the file or folder. Depending upon your pick, you lot tin can give certain permissions to the other users and these permissions include open, delete, create new files, and edit the files.
- Select that Utilize button after finalizing the permissions.
- Select the OK Push button to ensure that all the changes that you lot made to the permission section are saved.
3.3 Sharing files and folders in Windows 10 with a Detail User
Sometimes, at that place is a need that unlike files and folders are to be shared not among a grouping merely with a detail user. Follow the post-obit steps if you want to share your files and folders with a particular user in Windows 10:
- All the initial steps are the same. These steps include opening the file or folder in File Explorer that you want to share. Then going to the properties section. After selecting the sharing tab, follow the next steps for sharing the file or folder with a particular user.
- Select the Add push to add a new user with whom you want to share the file or folder.
Creating a new User for Sharing Files or Folders. - Enter the name of the user with which you will share the file or folder.
- Click the option of Check names.
- Select the Permissions that you want to requite to this user accordingly.
Customizing permissions for the users. - Click the OK button at the end to save your choices.
three.4 Sharing Files Over the Network without using a Countersign
In Windows 10, the file-sharing is protected past the use of a username and password by default. Sometimes, if you are sharing the file on your local network and y'all do not want people to admission the information past using passwords, then y'all can disable this option. For disabling this option, follow the following steps:
- Get to the Control Console.
- Navigate the Network and Sharing Eye pick.
- Select the Network and Sharing Heart option.

Network and Sharing middle in Windows x. - Select the pick of Change avant-garde sharing settings.
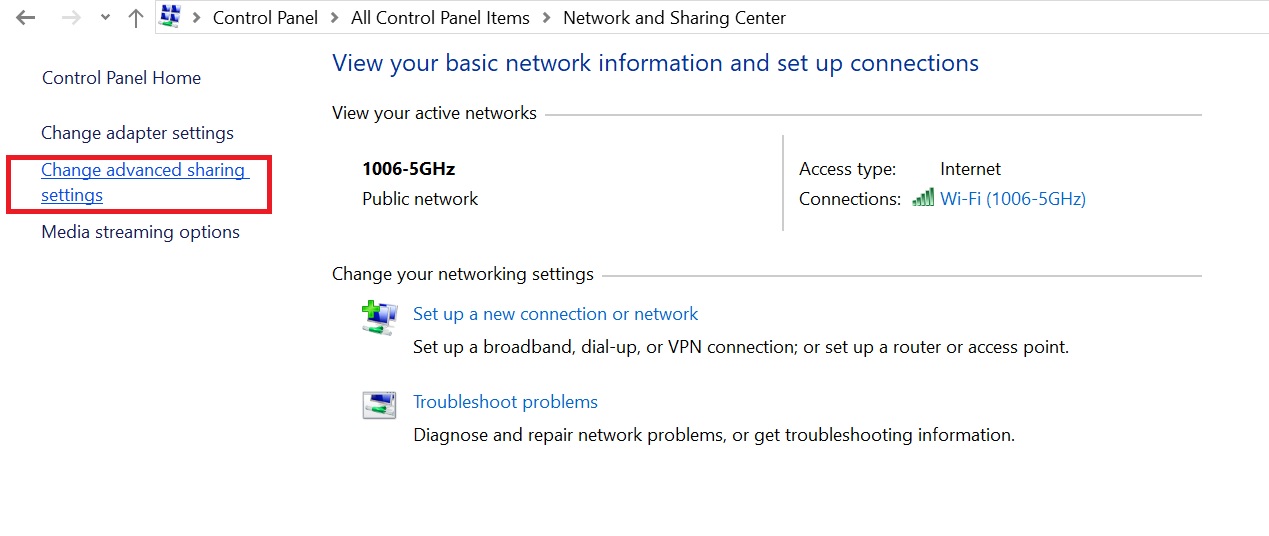
Advanced sharing options in Windows x. - Navigate to the option of Password protection sharing. Select the pick of "turning off password sharing protection".

Customizing Password Protection Settings in Windows 10. - Select the Salvage button to save all the changes.
- Afterwards post-obit the above-mentioned steps, all the users with whom you volition share your files and folders will not require any countersign to access the required materials.
In this style, by using the dissimilar methods mentioned in this tutorial, you can easily share your files and folders past using a network in Windows 10.
![]()
Source: https://appuals.com/how-to-share-folders-between-windows-7-and-windows-8/
Posted by: castillofille1973.blogspot.com
0 Response to "How To Share Files And Folders In Windows 7"
Post a Comment